
Chapter 2: Orientation & Environment Setup
In this chapter, we establish the development environment required to build our ExpenseApp while learning the core concepts of React Native. You will understand how React Native applications work, compare different development approaches, and create your first mobile application using both the React Native CLI and Expo.
This chapter is designed to help learners understand not only how to build React Native applications, but also why React Native has become one of the most popular cross-platform mobile development frameworks.
🎯 What You Will Learn
By the end of this chapter, you will:
- Understand the overall training roadmap and expected outcomes
- Learn what React Native is and how it works
- Compare React.js vs React Native
- Understand why React Native is popular for cross-platform development
- Compare React Native vs Flutter
- Compare Expo vs Bare React Native (CLI)
- Set up a complete development environment
- Create and run your first React Native application
- Understand how Metro bundler works
- Transition to Expo with a clean and scalable project structure
🚀 Training Overview
This course follows a hands-on, production-oriented approach.
We will build a real-world application:
👉 ExpenseApp — a cross-platform expense management system
Key Outcomes
- Build scalable mobile applications using React Native
- Use modern tools like TypeScript, Expo, and API integration
- Understand real-world architecture and folder organization
- Learn reusable component-based mobile UI development
- Understand production-ready project structure
📱 Introduction to React Native
React Native is an open-source mobile application framework created by Meta (Facebook).
It allows developers to build:
- Android applications
- iOS applications
- Cross-platform mobile apps
using:
👉 JavaScript / TypeScript + React
Unlike traditional hybrid frameworks, React Native renders actual native UI components instead of rendering inside a WebView.
This provides:
- Better performance
- Native user experience
- Reusable code across platforms
⚡ Key Features of React Native
- Cross-platform development
- Native rendering
- Reusable components
- Hot Reload / Fast Refresh
- Large ecosystem
- Strong community support
- JavaScript & TypeScript support
🏗️ React Native Application Architecture
React Native applications follow a layered architecture where the mobile application communicates with APIs and backend services through the Internet.

🔄 Architecture Flow
React Native App → Internet → APIs / Backend → Database
                                        ↓
                              External Services
🧩 Main Components of React Native Architecture
| Component | Responsibility |
|---|---|
| React Native App | User interaction and UI |
| APIs / Backend | Authentication, business logic, APIs |
| Database | Persistent data storage |
| External Services | Notifications, email, cloud integrations |
⚡ How React Native Works
Every React Native application follows a request-and-response cycle. User interactions trigger business logic, which communicates with backend services and updates the user interface based on the response.
- User interacts with the mobile application
- React Native processes UI and business logic
- API requests are sent to backend services
- Backend communicates with database and external services
- Response is returned back to the mobile app
- UI updates automatically
📱 Does React Native Use a WebView?
This is one of the most common interview questions for React Native developers. One of the most common misconceptions is that React Native applications run inside a browser-like container called a WebView.
The answer is:
👉 No. React Native does not use a WebView to render its core user interface.
Unlike hybrid frameworks such as:
- Cordova
- Ionic
- Capacitor
React Native renders actual native UI components provided by Android and iOS.
This is one of the key reasons React Native applications provide a native look, feel, and performance.
🏗️ How React Native Renders UI
When you write React Native code:
<View>
  <Text>Hello ExpenseApp</Text>
</View>
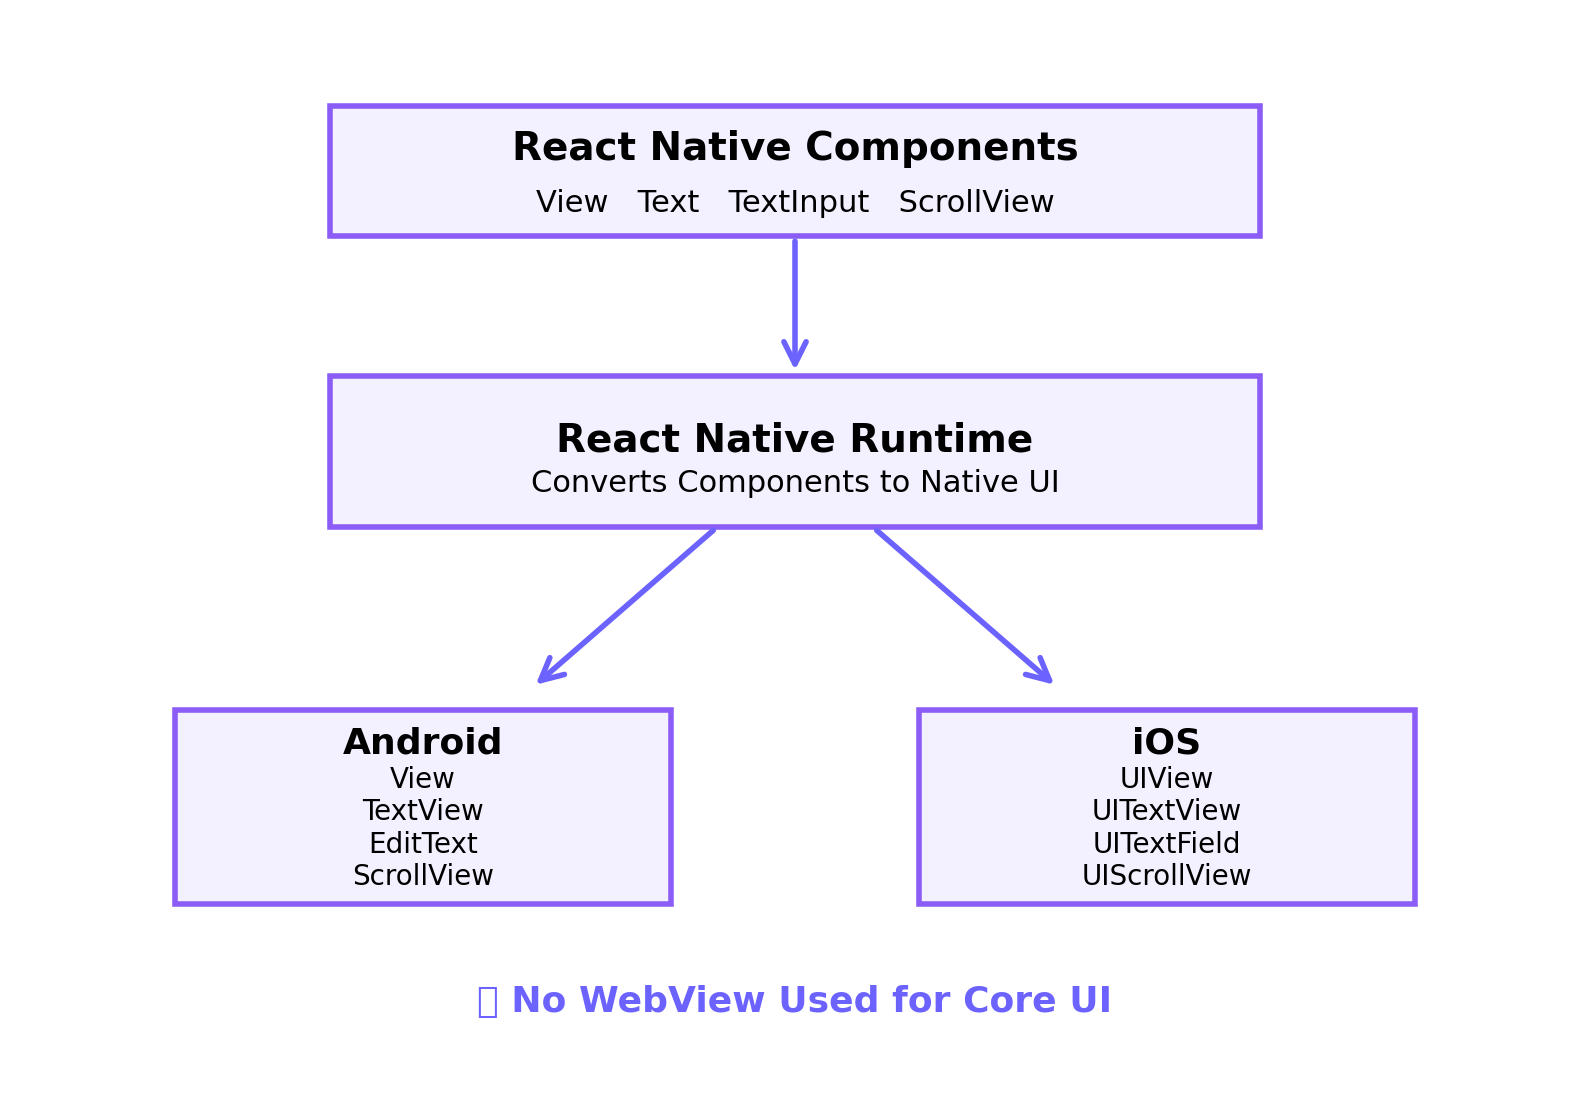
React Native converts these components into platform-specific native controls.
| React Native Component | Android Native Control | iOS Native Control |
|---|---|---|
View |
View |
UIView |
Text |
TextView |
UITextView |
TextInput |
EditText |
UITextField |
ScrollView |
ScrollView |
UIScrollView |
This means users interact with real native controls rather than HTML elements displayed inside a browser.
📱 React Native Rendering Architecture
📊 React Native vs Hybrid Frameworks
| Feature | React Native | Hybrid Apps (Cordova/Ionic) |
|---|---|---|
| UI Rendering | Native Components | HTML/CSS inside WebView |
| Performance | Near Native | Depends on WebView |
| Look & Feel | Native | Web-like |
| Access to Native APIs | Direct/Native Modules | Through Plugins |
🌐 When Does React Native Use a WebView?
Although React Native itself does not use a WebView for rendering UI, developers can optionally embed web content when needed.
Common scenarios include:
- Payment gateways
- Help pages
- Embedded websites
- HTML content
- Third-party web applications
For such cases, React Native provides the community-maintained package:
npm install react-native-webview
🧪 Example
import { WebView } from "react-native-webview";

export default function HelpPage() {
  return (
    <WebView
      source={{
        uri: "https://example.com/help",
      }}
    />
  );
}
💡 Real-world ExpenseApp Example
When a user adds a new expense:
- User enters expense information
- React Native validates the form
- API request is sent to backend server
- Expense data is stored in database
- Notification or analytics service may be triggered
- Success response is returned
- Expense list updates automatically
⚔️ React Native vs Flutter
Flutter is another popular cross-platform framework developed by Google.
Both frameworks are excellent choices for cross-platform development. React Native is often preferred by organizations with JavaScript or React expertise, while Flutter is a strong choice for teams comfortable with the Dart language and its rendering model.
Major Differences
| Feature | React Native | Flutter |
|---|---|---|
| Programming Language | JavaScript / TypeScript | Dart |
| UI Rendering | Native Components | Custom Rendering Engine |
| Learning Curve | Easier for web developers | Requires learning Dart |
| Ecosystem | Very large JavaScript ecosystem | Growing ecosystem |
| OTA Updates | Supported using Expo/EAS & CodePush | Limited native OTA support |
✅ Why Many Companies Prefer React Native
1. JavaScript & TypeScript Ecosystem
React Native uses JavaScript and TypeScript, which are already widely used in web development.
This helps developers transition quickly into mobile development.
2. Faster Developer Onboarding
Web developers familiar with React.js can learn React Native much faster compared to learning Flutter and Dart from scratch.
3. Native UI Components
React Native uses actual native components (View, Text, ScrollView, etc.), which helps applications feel more platform-native.
4. Over-the-Air (OTA) Updates
React Native supports OTA updates using:
- Expo Updates
- EAS Update
- Microsoft CodePush
This allows developers to push JavaScript/UI updates without publishing a full app update to Play Store or App Store in many cases.
👉 This is a major productivity advantage.
5. Large Community & Enterprise Adoption
React Native has strong enterprise adoption and a large open-source ecosystem.
Many production-ready libraries and tools are already available.
🏢 Popular Applications Built with React Native
- Shopify
- Discord
- Microsoft Office
- Tesla
⚛️ React.js vs React Native
Before we start coding, it is important to understand the distinction:
| Feature | React.js (Web) | React Native (Mobile) |
|---|---|---|
| Platform | Browser | Android / iOS |
| Components | HTML (div, span) | Native (View, Text) |
| Styling | CSS | StyleSheet / Flexbox |
| Rendering | DOM | Native rendering |
👉 React Native enables mobile app development using React concepts, but without HTML or traditional CSS.
📱 Expo vs Bare React Native
We will use both approaches in this course.
Bare React Native (CLI)
Advantages
- Full control over native code
- Suitable for enterprise-grade applications
- Better access to native modules
- No abstraction layer
Limitations
- Complex environment setup
- Requires Android Studio / Xcode configuration
- Slower development cycle
Expo
Advantages
- Extremely fast setup
- Easier development workflow
- Rich built-in APIs
- Faster testing and iteration
- Better beginner experience
Limitations
- Limited low-level native access
- Some libraries require ejecting
Recommended Learning Path
👉 Start with Bare React Native → Understand internals 👉 Move to Expo → Improve productivity and speed
🛠️ Step 1: Install Prerequisites
1. Node.js (LTS)
Install Node.js (LTS version).
Verify installation:
node -v
npm -v
2. VS Code Setup and Extensions
Install:
- ES7+ React/Redux Snippets
- Prettier
- ESLint
- React Native Tools
✅ Using VS Code Profiles (Recommended)
- Open Command Palette →
Ctrl + Shift + P - Select Profiles: Create Profile
- Create profile (e.g.,
ExpenseApp Dev) - Install extensions inside profile
👉 Helps isolate tools and avoid conflicts across projects
3. Android Studio / Xcode
- Install Android Studio for Android emulator
- Install Xcode (Mac only for iOS)
Ensure:
- Emulator is running OR
- Physical device is connected
⚙️ Step 2: Create Bare React Native App (CLI)
Reference:
👉 React Native Documentation – Getting Started Without a Framework
https://reactnative.dev/docs/getting-started-without-a-framework
⚠️ Remove Old CLI (Important)
npm uninstall -g react-native-cli @react-native-community/cli
Create New Project
npx @react-native-community/cli@latest init ExpenseApp
Navigate to Project
cd ExpenseApp
💡 iOS Troubleshooting (Mac Only)
If you face iOS issues:
cd ios
bundle install
bundle exec pod install
▶️ Step 3: Start Metro Bundler
Metro is the JavaScript build tool for React Native.
npm start
🧠 Key Insight
- Metro is similar to Webpack or Vite
- Uses Babel to convert JSX → JavaScript
- Handles bundling, caching, and live reload
▶️ Step 4: Run the Application
Open the project in Visual Studio Code (VS Code) and execute:
npm run android
OR:
npx react-native run-android
iOS
npx react-native run-ios
👉 You can also run directly from Android Studio or Xcode.
📱 Where Your App Runs
Your app runs on:
- Android Emulator
- iOS Simulator (Mac only)
- USB-connected mobile device
👉 This is where UI changes should be tested.
⚠️ Browser Behavior (Important)
You may see:
Starting dev server on http://localhost:8081
However:
❌ This URL does NOT render your mobile app UI in browser.
React Native renders using native components, not browser DOM.
✅ Correct Way to Test
Always test your app on:
- Android Emulator
- iOS Simulator
- Physical mobile device
💡 If Browser Support is Needed
Use:
- Expo Web
- React Native Web
✏️ Step 5: Modify the App
Update App.tsx:
import React from "react";

import { SafeAreaView, StyleSheet, Text } from "react-native";

const App = () => {
  return (
    <SafeAreaView style={styles.container}>
      <Text style={styles.text}>Welcome to ExpenseApp</Text>
    </SafeAreaView>
  );
};

export default App;

const styles = StyleSheet.create({
  container: {
    flex: 1,
    justifyContent: "center",
    alignItems: "center",
  },

  text: {
    fontSize: 20,
  },
});
🔄 Reload App
- Press
Rtwice - OR open Dev Menu → Reload
👉 You should now see:
Welcome to ExpenseApp
🔄 Step 6: Why Move to Expo?
At this point, you may notice:
- Setup complexity
- Native dependency management
- Slower iteration
👉 Expo simplifies all of this.
⚡ Step 7: Create Expo App (TypeScript)
Create a new Expo TypeScript project:
npx create-expo-app ExpenseApp
Navigate into the project:
cd ExpenseApp
Start Expo development server:
npx expo start
🚀 What Expo Creates Automatically
Expo generates a production-ready React Native project structure with:
- TypeScript support
- Expo Router support
- ESLint configuration
- Package management
- Metro bundler setup
- Cross-platform support
This saves significant setup time compared to manual React Native configuration.
🧹 Step 8: Reset the Expo Project
Expo starter templates include demo screens and sample code.
Reset the project:
npm run reset-project
If unavailable:
- Remove demo files manually
- Keep only required project structure
👉 This ensures a clean production-ready starting point.
📦 Step 9: Move Application Code into src
To keep the project scalable and organized:
- Move application logic into
src/ - Keep root folder clean
- Separate configuration from application code
This approach is widely used in enterprise applications.
🏗️ Recommended Expo Project Structure

🔄 React Native Entry Flow
package.json
      ↓
expo-router/entry
      ↓
src/app/_layout.tsx
      ↓
src/app/index.tsx
📄 Important Root Files
package.json
Contains:
- Project metadata
- Dependencies
- Scripts
- Application entry point
Example:
{
  "main": "expo-router/entry"
}
👉 This tells Expo Router where the application starts.
package-lock.json
Automatically generated by npm.
Purpose:
- Locks dependency versions
- Ensures consistent installations across environments
.gitignore
Specifies files/folders Git should ignore.
Common ignored folders:
node_modules
.expo
dist
eslint.config.js
Used for:
- Code quality checks
- Formatting rules
- Best practice enforcement
Helps maintain clean and consistent code.
tsconfig.json
TypeScript configuration file.
Controls:
- Path aliases
- TypeScript compiler behavior
- Strict type checking
app.json
Expo application configuration file.
Contains:
- App name
- App icon
- Splash screen
- Bundle identifiers
- Expo configuration
🧠 Understanding the Entry Point
In Expo Router applications:
package.json
points to:
expo-router/entry
Expo Router then automatically loads:
src/app/_layout.tsx
which becomes the root navigation layout.
Finally:
src/app/index.tsx
becomes the first screen displayed to the user.
🔌 Step 11: Update Entry Point
Update src/app/index.tsx
import { StyleSheet, Text, View } from "react-native";

export default function Index() {
  return (
    <View style={styles.container}>
      <Text style={styles.title}>Welcome to ExpenseApp!</Text>
    </View>
  );
}

const styles = StyleSheet.create({
  container: {
    flex: 1,
    backgroundColor: "#fff",
    alignItems: "center",
    justifyContent: "center",
  },

  title: {
    fontSize: 20,
    fontWeight: "bold",
  },
});
✅ Best Practices
- Use latest LTS version of Node.js
- Prefer Expo for faster development
- Organize code inside
src/ - Use ESLint and Prettier
⚠️ Common Mistakes
- Trying to render React Native UI in browser
- Forgetting to start Metro bundler
- Mixing project files in root directory
- Installing old global React Native CLI
🧪 Practice Exercises
- Create a new Expo TypeScript project
- Modify the welcome message styling
- Create additional folders inside
src - Run app on emulator and physical device
📘 Chapter Summary
In this chapter, you:
- Learned React Native fundamentals
- Understood React Native architecture
- Compared React Native vs Flutter
- Compared React.js vs React Native
- Compared Expo vs Bare CLI
- Set up development environment
- Created your first React Native application
- Learned about Metro bundler
- Transitioned to Expo
- Established scalable project structure