
Chapter 5: Lists & Layout with Flexbox
🚀 Introduction
In previous chapters, we built the basic ExpenseApp UI and learned:
- JSX
- Styling
- State
- Props
- Component Architecture
Now we will enhance ExpenseApp further by displaying multiple expenses using responsive layouts and efficient list rendering.
In real-world applications, we frequently display collections of data such as:
- Expenses
- Transactions
- Products
- Notifications
- Dashboard cards
- Reports
To build such screens effectively, React Native provides powerful tools like:
- Flexbox
- ScrollView
- FlatList
This chapter focuses on building professional expense list layouts using Flexbox and optimized list rendering techniques.
🎯 What You Will Learn
By the end of this chapter, you will:
- Understand advanced Flexbox concepts
- Build row and column layouts
- Use
justifyContentandalignItems - Understand main axis and cross axis
- Render lists using
ScrollView - Render optimized lists using
FlatList - Use keys properly
- Apply basic list performance optimizations
- Improve ExpenseApp UI using Flexbox
📐 Understanding Flexbox
Flexbox is the primary layout system in React Native.
It helps arrange UI components in a flexible and responsive way across different screen sizes.
Unlike traditional web layouts, React Native relies heavily on Flexbox for most screen designs.
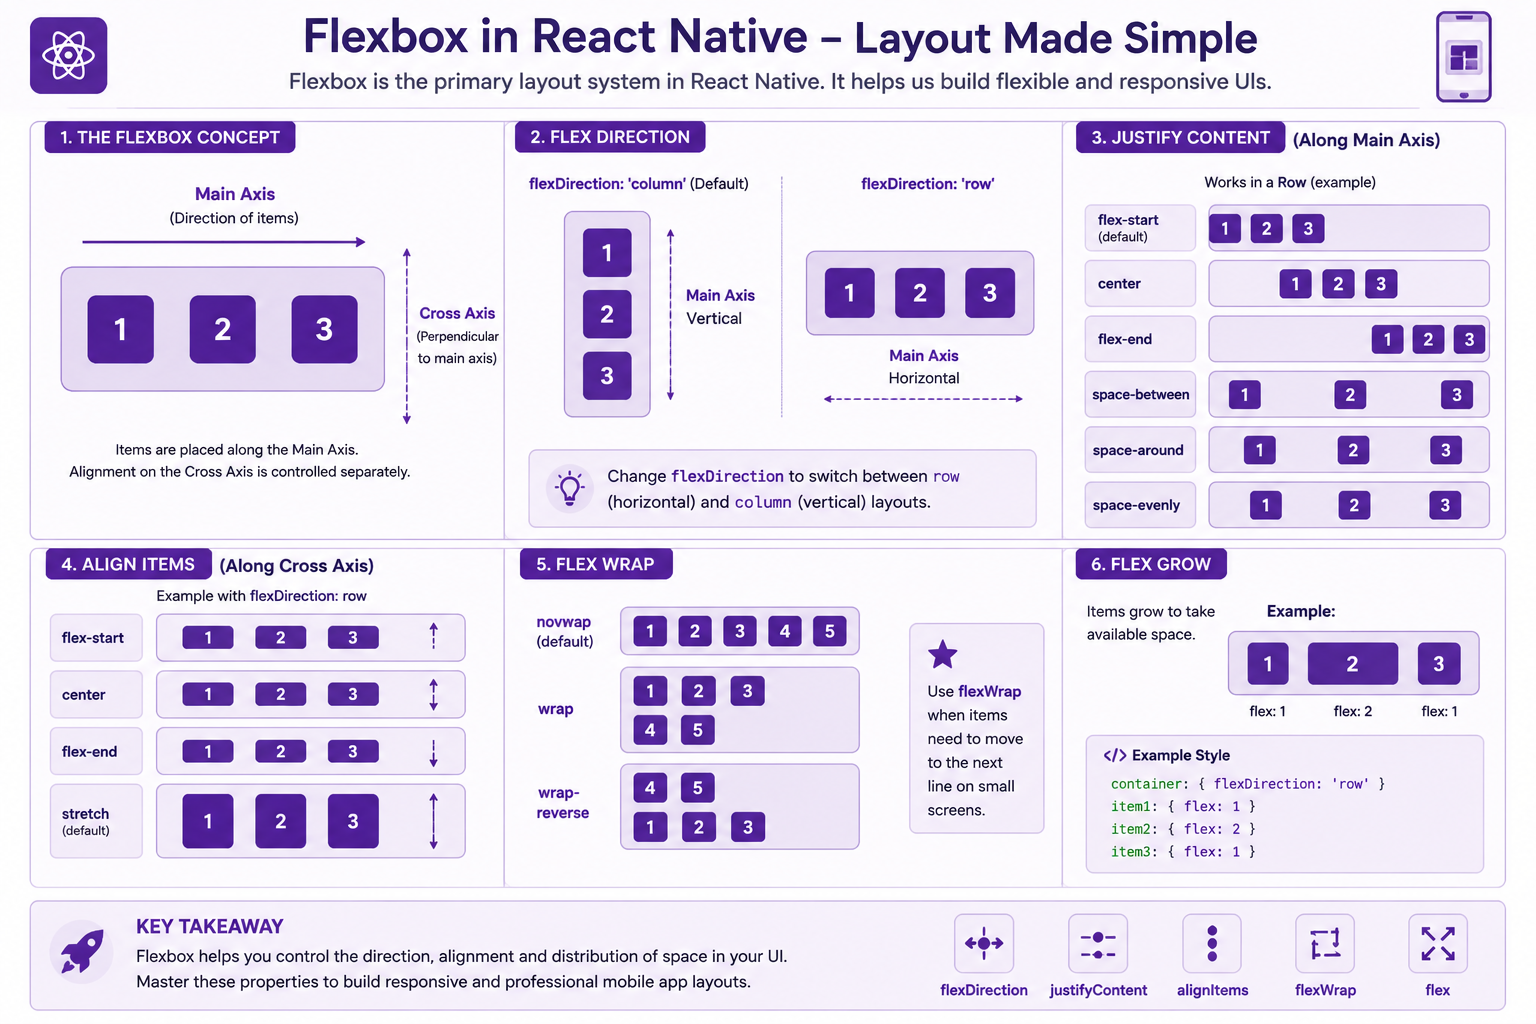
📱 Default Flexbox Behavior
React Native uses:
flexDirection: "column";
by default.
This means components are automatically arranged from:
Top → Bottom
🧱 Understanding Row vs Column Layouts
Understanding rows and columns is essential for responsive UI design.
📦 Column Layout (Default)
In a column layout, items are stacked vertically.
🧪 ExpenseApp Example
Take the same ExpenseDetail example from the previous chapter.
export default function ExpenseDetail({
  description,
  amount,
}: {
  description: string;
  amount: number;
}) {
  return (
    <View style={styles.container}>
      <Text style={styles.label}>{description}</Text>
      <Text style={styles.label}>Amount: ₹{amount.toFixed(2)}</Text>
    </View>
  );
}
📱 Result
Food
₹500
Items are displayed vertically.
📊 Axis Information
| Property | Value |
|---|---|
| Main Axis | Vertical |
| Cross Axis | Horizontal |
📦 Row Layout
In a row layout, items are arranged horizontally.
🧪 ExpenseApp Row Example
export default function ExpenseDetail({
  description,
  amount,
}: {
  description: string;
  amount: number;
}) {
  return (
    <View
      style={{
        flexDirection: "row",
      }}
    >
      <Text style={styles.label}>{description}</Text>
      <Text style={styles.label}>Amount: ₹{amount.toFixed(2)}</Text>
    </View>
  );
}
📱 Result
Food ₹500
Items are displayed from left to right.
📊 Axis Information
| Property | Value |
|---|---|
| Main Axis | Horizontal |
| Cross Axis | Vertical |
🔄 Understanding Main Axis & Cross Axis
The main axis always follows the direction of flexDirection.
📊 Main Axis Table
| flexDirection | Main Axis |
|---|---|
column |
Vertical |
row |
Horizontal |
The cross axis is always perpendicular to the main axis.
📏 justifyContent
justifyContent controls alignment along the main axis.
It is mainly used for:
- Spacing
- Positioning
- Distribution of items
🧪 ExpenseApp Example
<View
  style={{
    flexDirection: "row",
    justifyContent: "space-between",
  }}
>
  <Text>Food</Text>

  <Text>₹500</Text>
</View>
📱 Result
Food ₹500
Space is distributed between items.
📋 Common justifyContent Values
| Value | Description |
|---|---|
flex-start |
Items start from beginning |
center |
Items centered |
flex-end |
Items aligned at end |
space-between |
Equal space between items |
space-around |
Equal space around items |
space-evenly |
Equal spacing everywhere |
📏 alignItems
alignItems controls alignment along the cross axis.
🧪 ExpenseApp Example
<View
  style={{
    height: 100,
    alignItems: "center",
  }}
>
  <Text>Expense Item</Text>
</View>
📱 Result
If the layout direction is column (default), the content becomes horizontally centered.
📋 Common alignItems Values
| Value | Description |
|---|---|
flex-start |
Align at start |
center |
Center items |
flex-end |
Align at end |
stretch |
Stretch items |
🎨 Improving ExpenseDetail Layout
Now let us improve the layout of the ExpenseDetail component using Flexbox.
📁 Update ExpenseDetail Component
📁 app/(transaction)/detail.tsx
import React from "react";

import { Text, View } from "react-native";

import { Expense } from "@/src/types/expense";

import { styles } from "@/src/styles/styles";

export default function ExpenseDetail({
  description,
  amount,
}: {
  description: string;
  amount: number;
}) {
  return (
    <View style={styles.container}>
      <Text style={styles.label}>{description}</Text>
      <Text style={styles.label}>Amount: ₹{amount.toFixed(2)}</Text>
    </View>
  );
}
📁 Update styles.ts
📁 src/styles/styles.ts
Add the following styles:
row: {
    flexDirection: "row",
    justifyContent: "space-between",
    alignItems: "center",
    padding: 15,
    marginBottom: 10,
    borderWidth: 1,
    borderColor: "#ddd",
    borderRadius: 10,
},

description: {
    fontSize: 16,
},

amount: {
    fontSize: 16,
    fontWeight: "bold",
},
📱 Result
This creates a clean expense row layout:
Food                     ₹500
Travel                   ₹1200
Shopping                 ₹750
📋 Rendering Lists
Displaying lists of data is one of the most common tasks in mobile applications.
React Native provides multiple approaches for rendering lists.
The two most common are:
- ScrollView
- FlatList
📜 ScrollView
ScrollView is useful for:
- Small datasets
- Forms
- Static content
- Short lists
It renders all child components immediately.
🧪 ScrollView Example
import { ScrollView } from "react-native";

<ScrollView>
  {expenses.map((expense, index) => (
    <ExpenseDetail
      key={index}
      description={expense.description}
      amount={expense.amount}
    />
  ))}
</ScrollView>;
🔄 Understanding map()
The JavaScript map() method transforms array data into UI elements.
🧪 Example
expenses.map((item) => <ExpenseDetail description="Grocery Shopping" amount={1500} />;
🔑 Why Keys Are Important
Keys help React identify which items changed.
Without keys:
- Rendering becomes inefficient
- UI bugs may occur
- React cannot track items properly
✅ Good Key Example
key={item.id}
❌ Bad Key Example
key = { index };
Avoid indexes whenever possible.
⚠️ Limitations of ScrollView
ScrollView renders all items immediately.
Problems with large datasets:
- Higher memory usage
- Slower rendering
- Reduced scrolling performance
🧪 Full Expense List Example Using ScrollView
📁 app/index.tsx
import React from "react";
import { SafeAreaView, ScrollView } from "react-native";
import { Expense } from "../types/expense";
import ExpenseDetail from "./(transaction)/detail";

export default function Index() {
  const expenses: Expense[] = [
    { description: "Grocery Shopping", amount: 1500 },
    { description: "Electricity Bill", amount: 800 },
    { description: "Movie Tickets", amount: 500 },
    { description: "Online Course", amount: 2000 },
    { description: "Gym Membership", amount: 1200 },
    { description: "Dining Out", amount: 700 },
    { description: "Travel Expenses", amount: 3000 },
    { description: "Health Checkup", amount: 2500 },
    { description: "Books", amount: 600 },
    { description: "Clothing", amount: 1800 },
    { description: "Subscription Services", amount: 400 },
    { description: "Gadget Purchase", amount: 3500 },
    { description: "Home Decor", amount: 2200 },
    { description: "Pet Supplies", amount: 900 },
    { description: "Charity Donation", amount: 1000 },
    { description: "Coffee", amount: 300 },
    { description: "Public Transport", amount: 150 },
    { description: "Phone Bill", amount: 800 },
    { description: "Internet Bill", amount: 1200 },
    { description: "Miscellaneous", amount: 500 },
    { description: "Gift", amount: 2000 },
    { description: "Car Maintenance", amount: 4000 },
    { description: "Personal Care", amount: 700 },
    { description: "Entertainment", amount: 1500 },
    { description: "Education", amount: 2500 },
  ];
  return (
    <SafeAreaView style={{ flex: 1 }}>
      <ScrollView>
        {expenses.map((expense, index) => (
          <ExpenseDetail
            key={index}
            description={expense.description}
            amount={expense.amount}
          />
        ))}
      </ScrollView>
    </SafeAreaView>
  );
}
🚀 FlatList (Recommended)
FlatList is a high-performance React Native component designed for large datasets.
Unlike ScrollView, it renders only visible items on screen.
This approach is called:
Virtualized Rendering
🧪 Basic FlatList Example
import { FlatList } from "react-native";

<FlatList
  data={expenses}
  keyExtractor={(item, index) => index.toString()}
  renderItem={({ item }) => (
    <ExpenseDetail description={item.description} amount={item.amount} />
  )}
/>;
🔍 Understanding renderItem
renderItem defines how each expense row appears.
🧪 Example
renderItem={({ item }) => (
    <ExpenseDetail description={item.description} amount={item.amount} />
)}
🔑 keyExtractor
keyExtractor provides unique keys for list items.
🧪 Example
keyExtractor={(item, index) =>
    index.toString()
}
Always use:
- Unique values (e.g., id of the row from a table in a DB)
- Stable identifiers
- Database IDs whenever possible
➕ Adding Item Separators
Separators improve readability and spacing.
🧪 Example
ItemSeparatorComponent={() => (
    <View style={{ height: 10 }} />
)}
🧪 Full Expense List Example Using FlatList
📁 app/index.tsx
import React from "react";
import { SafeAreaView } from "react-native";
import { FlatList } from "react-native-reanimated/lib/typescript/Animated";
import { Expense } from "../types/expense";
import ExpenseDetail from "./(transaction)/detail";

export default function Index() {
  const expenses: Expense[] = [
    { description: "Grocery Shopping", amount: 1500 },
    { description: "Electricity Bill", amount: 800 },
    { description: "Movie Tickets", amount: 500 },
    { description: "Online Course", amount: 2000 },
    { description: "Gym Membership", amount: 1200 },
    { description: "Dining Out", amount: 700 },
    { description: "Travel Expenses", amount: 3000 },
    { description: "Health Checkup", amount: 2500 },
    { description: "Books", amount: 600 },
    { description: "Clothing", amount: 1800 },
    { description: "Subscription Services", amount: 400 },
    { description: "Gadget Purchase", amount: 3500 },
    { description: "Home Decor", amount: 2200 },
    { description: "Pet Supplies", amount: 900 },
    { description: "Charity Donation", amount: 1000 },
    { description: "Coffee", amount: 300 },
    { description: "Public Transport", amount: 150 },
    { description: "Phone Bill", amount: 800 },
    { description: "Internet Bill", amount: 1200 },
    { description: "Miscellaneous", amount: 500 },
    { description: "Gift", amount: 2000 },
    { description: "Car Maintenance", amount: 4000 },
    { description: "Personal Care", amount: 700 },
    { description: "Entertainment", amount: 1500 },
    { description: "Education", amount: 2500 },
  ];
  return (
    <SafeAreaView style={{ flex: 1 }}>
      <FlatList
        data={expenses}
        keyExtractor={(item, index) => index.toString()}
        renderItem={({ item }) => (
          <ExpenseDetail description={item.description} amount={item.amount} />
        )}
      />
    </SafeAreaView>
  );
}
✅ Why FlatList is Better
FlatList provides:
- Lazy rendering
- Better memory management
- Smooth scrolling
- Improved performance
📋 FlatList Best Practices
- Use
keyExtractor - Keep item UI lightweight
- Avoid unnecessary re-renders
- Extract
renderItemoutside JSX - Use reusable components
🧪 Example Optimization
const renderItem = ({ item }) => <ExpenseDetail expense={item} />;

<FlatList
  data={expenses}
  keyExtractor={(item, index) => index.toString()}
  renderItem={({ item }) => (
    <ExpenseDetail description={item.description} amount={item.amount} />
  )}
/>;
↔️ Horizontal Lists
FlatList also supports horizontal scrolling.
🧪 Expense Category Example
<FlatList
  horizontal
  data={["Food", "Travel", "Shopping", "Bills"]}
  renderItem={({ item }) => (
    <View style={styles.categoryCard}>
      <Text>{item}</Text>
    </View>
  )}
  keyExtractor={(item) => item}
/>
📋 Common Use Cases of Horizontal Lists
Horizontal lists are commonly used for:
- Expense categories
- Dashboard cards
- Product sliders
- Summary cards
- News carousels
⚡ Important Notes
- Flexbox is the foundation of React Native layouts
- React Native uses column layout by default
ScrollViewis suitable for small listsFlatListis preferred for large datasets- Always use proper keys
- Layout design directly affects user experience
⚠️ Common Beginner Mistakes
| Mistake | Correct Approach |
|---|---|
Using ScrollView for huge datasets |
Use FlatList |
| Forgetting keys | Use unique identifiers |
| Using array indexes as keys | Use stable IDs |
| Writing large inline styles | Move styles to styles.ts |
| Overcomplicated layouts | Use Flexbox properly |
✅ Best Practices
- Use
FlatListinstead ofScrollViewfor large datasets - Keep layout styles reusable by moving them into
styles.ts - Use meaningful and unique keys for list items
- Create reusable UI components like
ExpenseDetail - Use Flexbox consistently for responsive layouts
🧪 Practice Exercises
- Add a category label beside each expense item
- Create a horizontal
FlatListof expense categories - Add spacing between expense cards using Flexbox styles
- Display at least 20 dummy expenses using
FlatList - Add colored expense cards using
backgroundColor
📘 Chapter Summary
In this chapter, you:
- Learned advanced Flexbox concepts
- Built row and column layouts
- Used
justifyContentandalignItems - Understood main axis and cross axis
- Rendered lists using
ScrollView - Built optimized lists using
FlatList - Used keys correctly
- Applied basic list performance optimizations
- Improved ExpenseApp layout using Flexbox
- Built reusable expense list components