
Chapter 2: Selenium WebDriver Architecture and Setup
In the previous chapter, we explored the test automation landscape and learned why Selenium has become the industry standard for web automation.
In this chapter, we will set up our development environment, understand Selenium WebDriver architecture in depth, and write our first automated test.
Using our Insurance Policy Management System (IPMS), we will create a solid foundation for our test automation framework.
🎯 Learning Objectives
By the end of this chapter, you will be able to:
- Set up a Selenium project with Maven
- Understand Selenium WebDriver architecture
- Configure WebDriver for different browsers
- Write your first Selenium test
- Understand browser driver management
- Implement proper setup and teardown methods
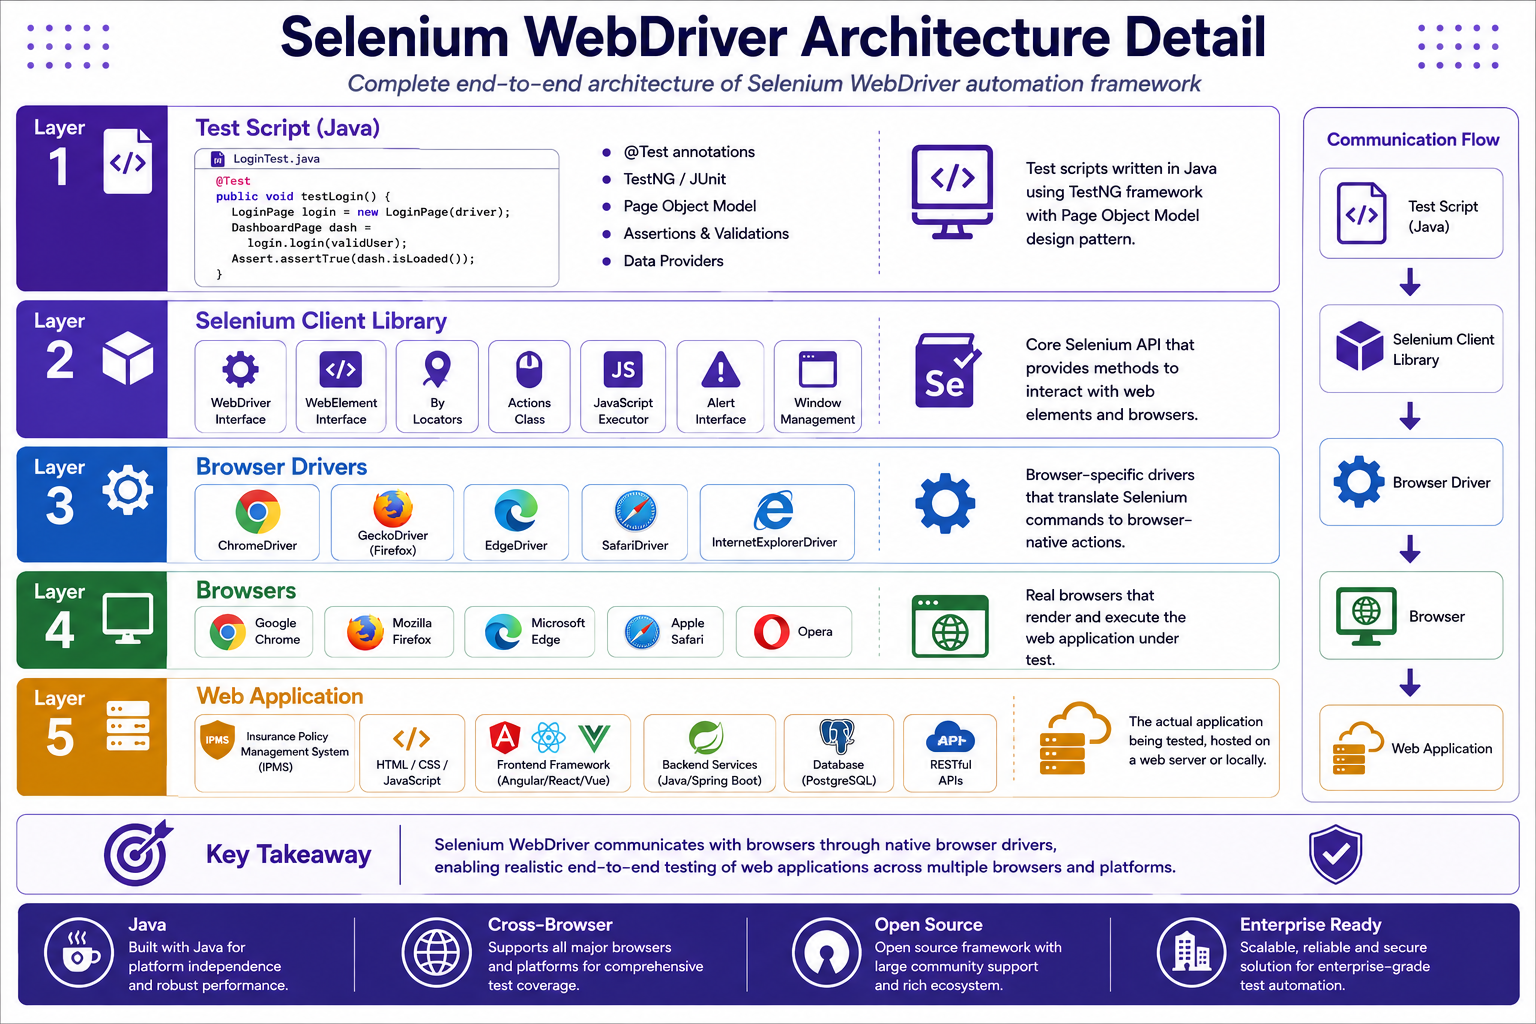
Selenium WebDriver Architecture Deep Dive
Selenium WebDriver follows a client-server architecture.
Core Components
Selenium Client Library
Language-specific bindings
Java, Python, C#, Ruby, JavaScript
WebDriver API
Standardized methods for browser automation
findElement(), click(), sendKeys(), getText()
Browser Driver
Browser-specific executable
ChromeDriver, GeckoDriver, EdgeDriver
Browser
Actual browser instance
Chrome, Firefox, Edge, Safari
Project Setup with Maven
Step 1: Create Maven Project
<project xmlns="http://maven.apache.org/POM/4.0.0"
         xmlns:xsi="http://www.w3.org/2001/XMLSchema-instance"
         xsi:schemaLocation="http://maven.apache.org/POM/4.0.0
         http://maven.apache.org/xsd/maven-4.0.0.xsd">
    <modelVersion>4.0.0</modelVersion>
    <groupId>com.insurance</groupId>
    <artifactId>insurance-test-automation</artifactId>
    <version>1.0-SNAPSHOT</version>
</project>
Step 2: Add Dependencies
<dependencies>
    <!-- Selenium WebDriver -->
    <dependency>
        <groupId>org.seleniumhq.selenium</groupId>
        <artifactId>selenium-java</artifactId>
        <version>4.15.0</version>
    </dependency>

    <!-- TestNG -->
    <dependency>
        <groupId>org.testng</groupId>
        <artifactId>testng</artifactId>
        <version>7.8.0</version>
        <scope>test</scope>
    </dependency>

    <!-- WebDriverManager -->
    <dependency>
        <groupId>io.github.bonigarcia</groupId>
        <artifactId>webdrivermanager</artifactId>
        <version>5.6.2</version>
    </dependency>

    <!-- Logging -->
    <dependency>
        <groupId>org.slf4j</groupId>
        <artifactId>slf4j-simple</artifactId>
        <version>2.0.9</version>
    </dependency>
</dependencies>
Step 3: Add Build Plugins
<build>
    <plugins>
        <plugin>
            <groupId>org.apache.maven.plugins</groupId>
            <artifactId>maven-compiler-plugin</artifactId>
            <version>3.11.0</version>
            <configuration>
                <source>21</source>
                <target>21</target>
            </configuration>
        </plugin>
        <plugin>
            <groupId>org.apache.maven.plugins</groupId>
            <artifactId>maven-surefire-plugin</artifactId>
            <version>3.1.2</version>
            <configuration>
                <suiteXmlFiles>
                    <suiteXmlFile>testng.xml</suiteXmlFile>
                </suiteXmlFiles>
            </configuration>
        </plugin>
    </plugins>
</build>
WebDriverManager Setup
WebDriverManager automatically manages browser drivers.
Why WebDriverManager?
✅ Automatically downloads drivers
✅ Manages driver versions
✅ No manual driver setup
✅ Supports all major browsers
✅ Handles driver path configuration
Browser Configuration
import io.github.bonigarcia.wdm.WebDriverManager;
import org.openqa.selenium.WebDriver;
import org.openqa.selenium.chrome.ChromeDriver;
import org.openqa.selenium.chrome.ChromeOptions;
import org.openqa.selenium.firefox.FirefoxDriver;
import org.openqa.selenium.edge.EdgeDriver;

public class DriverManager {

    public WebDriver getChromeDriver() {
        WebDriverManager.chromedriver().setup();
        ChromeOptions options = new ChromeOptions();
        options.addArguments("--start-maximized");
        options.addArguments("--disable-notifications");
        return new ChromeDriver(options);
    }

    public WebDriver getFirefoxDriver() {
        WebDriverManager.firefoxdriver().setup();
        return new FirefoxDriver();
    }

    public WebDriver getEdgeDriver() {
        WebDriverManager.edgedriver().setup();
        return new EdgeDriver();
    }
}
First Selenium Test
Test Scenario
Test Case: Login to Insurance Policy Management System

Steps:
1. Navigate to login page
2. Enter username: agent
3. Enter password: password123
4. Click login button
5. Verify dashboard is displayed
Test Implementation
import io.github.bonigarcia.wdm.WebDriverManager;
import org.openqa.selenium.By;
import org.openqa.selenium.WebDriver;
import org.openqa.selenium.WebElement;
import org.openqa.selenium.chrome.ChromeDriver;
import org.testng.Assert;
import org.testng.annotations.AfterMethod;
import org.testng.annotations.BeforeMethod;
import org.testng.annotations.Test;

public class LoginTest {

    private WebDriver driver;
    private static final String BASE_URL = "https://insurance-app.example.com";

    @BeforeMethod
    public void setup() {
        WebDriverManager.chromedriver().setup();
        driver = new ChromeDriver();
        driver.manage().window().maximize();
    }

    @Test
    public void testValidLogin() {
        // Navigate to login page
        driver.get(BASE_URL + "/login");

        // Find username field and enter value
        WebElement usernameField = driver.findElement(By.id("username"));
        usernameField.sendKeys("agent");

        // Find password field and enter value
        WebElement passwordField = driver.findElement(By.id("password"));
        passwordField.sendKeys("password123");

        // Find login button and click
        WebElement loginButton = driver.findElement(By.id("loginBtn"));
        loginButton.click();

        // Verify login success
        String expectedUrl = BASE_URL + "/dashboard";
        Assert.assertEquals(driver.getCurrentUrl(), expectedUrl, "Login failed");

        // Verify welcome message
        WebElement welcomeText = driver.findElement(By.cssSelector(".welcome-message"));
        Assert.assertTrue(welcomeText.isDisplayed(), "Welcome message not displayed");
    }

    @AfterMethod
    public void teardown() {
        if (driver != null) {
            driver.quit();
        }
    }
}
Common Locator Strategies
ID Locator
driver.findElement(By.id("username"));
Name Locator
driver.findElement(By.name("password"));
Class Name Locator
driver.findElement(By.className("login-btn"));
CSS Selector
driver.findElement(By.cssSelector("#username"));
driver.findElement(By.cssSelector(".login-form input[type='text']"));
XPath Locator
driver.findElement(By.xpath("//input[@id='username']"));
driver.findElement(By.xpath("//button[text()='Login']"));
Tag Name Locator
driver.findElement(By.tagName("h1"));
Link Text Locator
driver.findElement(By.linkText("Forgot Password"));
Partial Link Text
driver.findElement(By.partialLinkText("Forgot"));
Browser Interactions
Navigation
// Navigate to URL
driver.get("https://insurance-app.example.com");

// Navigate back
driver.navigate().back();

// Navigate forward
driver.navigate().forward();

// Refresh page
driver.navigate().refresh();
Window Management
// Maximize window
driver.manage().window().maximize();

// Set window size
driver.manage().window().setSize(new Dimension(1920, 1080));

// Get window handle
String windowHandle = driver.getWindowHandle();

// Switch to new window
driver.switchTo().window(windowHandle);
Element Interactions
// Click
element.click();

// Type text
element.sendKeys("text");

// Clear text
element.clear();

// Get text
String text = element.getText();

// Get attribute
String value = element.getAttribute("value");

// Check if displayed
boolean displayed = element.isDisplayed();

// Check if enabled
boolean enabled = element.isEnabled();

// Check if selected
boolean selected = element.isSelected();
Synchronization Strategies
Implicit Wait
driver.manage().timeouts().implicitlyWait(Duration.ofSeconds(10));
Explicit Wait
import org.openqa.selenium.support.ui.ExpectedConditions;
import org.openqa.selenium.support.ui.WebDriverWait;

WebDriverWait wait = new WebDriverWait(driver, Duration.ofSeconds(10));
wait.until(ExpectedConditions.visibilityOfElementLocated(By.id("username")));
Fluent Wait
import org.openqa.selenium.support.ui.FluentWait;

FluentWait<WebDriver> wait = new FluentWait<>(driver)
    .withTimeout(Duration.ofSeconds(30))
    .pollingEvery(Duration.ofSeconds(5))
    .ignoring(NoSuchElementException.class);
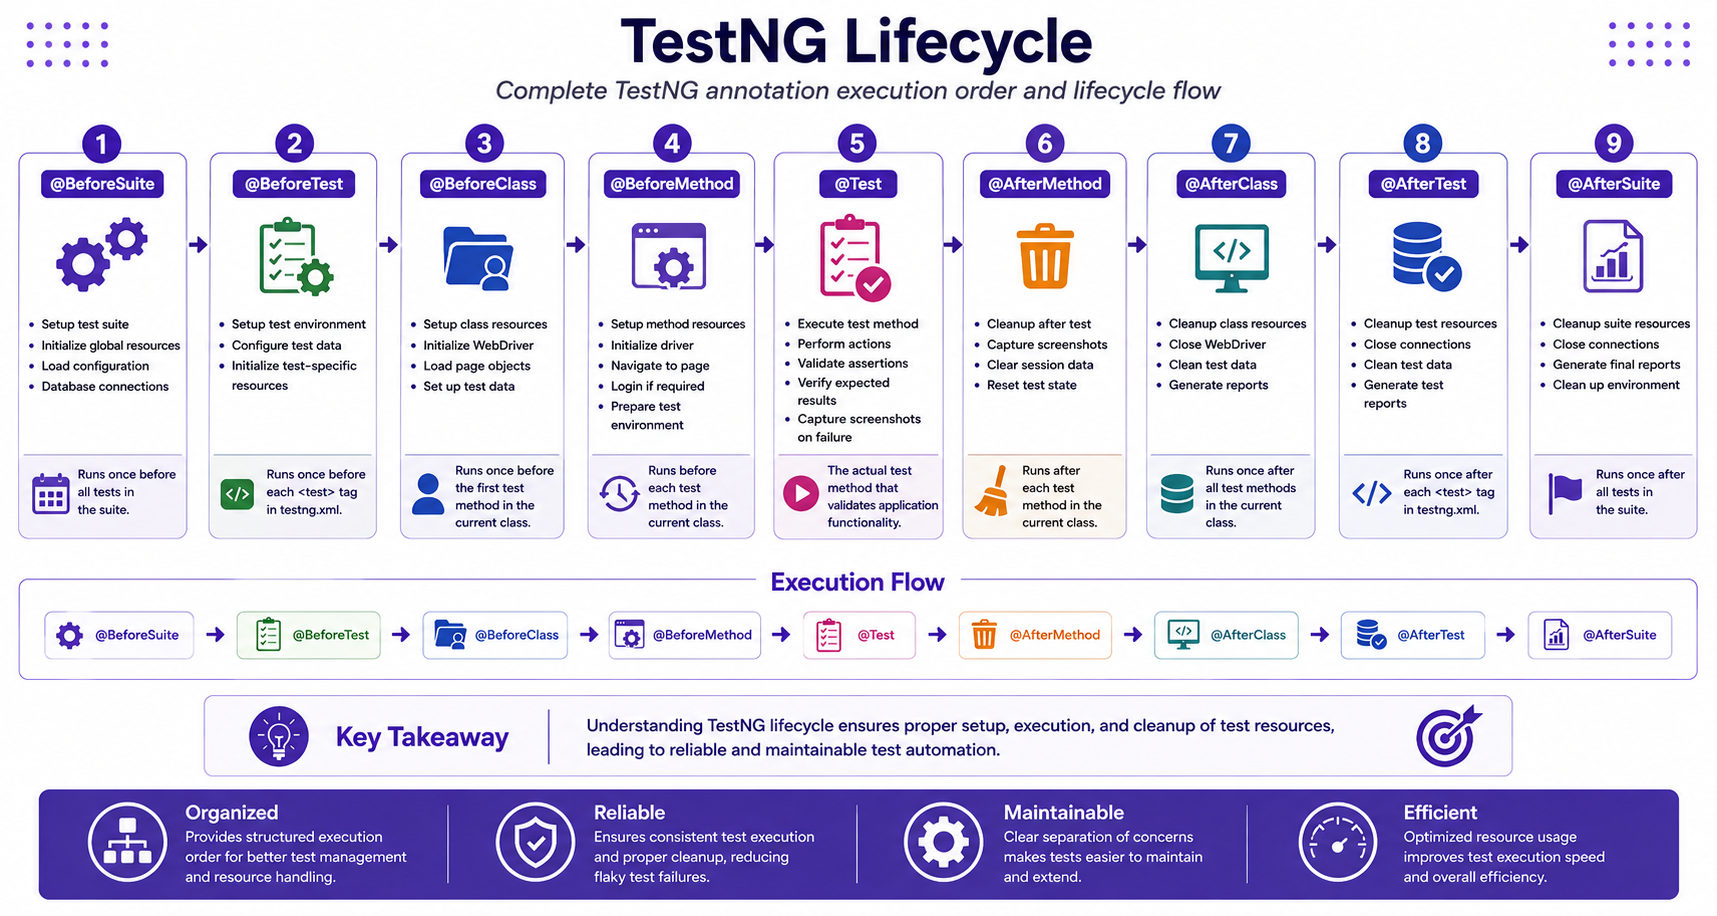
TestNG Annotations
Common Annotations
@BeforeSuite    // Runs once before all tests
@BeforeTest     // Runs before each test tag
@BeforeClass    // Runs once before class
@BeforeMethod   // Runs before each test method
@Test           // Test method
@AfterMethod    // Runs after each test method
@AfterClass     // Runs once after class
@AfterTest      // Runs after each test tag
@AfterSuite     // Runs once after all tests
TestNG Example
import org.testng.annotations.*;

public class PolicyTest {

    @BeforeSuite
    public void setupSuite() {
        System.out.println("Initializing test suite");
    }

    @BeforeMethod
    public void setupTest() {
        driver = new ChromeDriver();
        login();
    }

    @Test(priority = 1)
    public void testCreatePolicy() {
        // Test implementation
    }

    @Test(priority = 2, dependsOnMethods = "testCreatePolicy")
    public void testViewPolicy() {
        // Test implementation
    }

    @AfterMethod
    public void cleanupTest() {
        driver.quit();
    }

    @AfterSuite
    public void cleanupSuite() {
        System.out.println("Test suite completed");
    }
}
Test Data Management
Data Providers
@DataProvider(name = "policyData")
public Object[][] getPolicyData() {
    return new Object[][] {
        {"TERM", "500000", "2500"},
        {"WHOLE_LIFE", "1000000", "5000"},
        {"UNIVERSAL", "250000", "1250"}
    };
}

@Test(dataProvider = "policyData")
public void testCreatePolicy(String type, String coverage, String premium) {
    // Test using provided data
}
TestNG Lifecycle
Understanding TestNG annotations and their execution order is crucial for proper test setup and teardown.
Project Structure
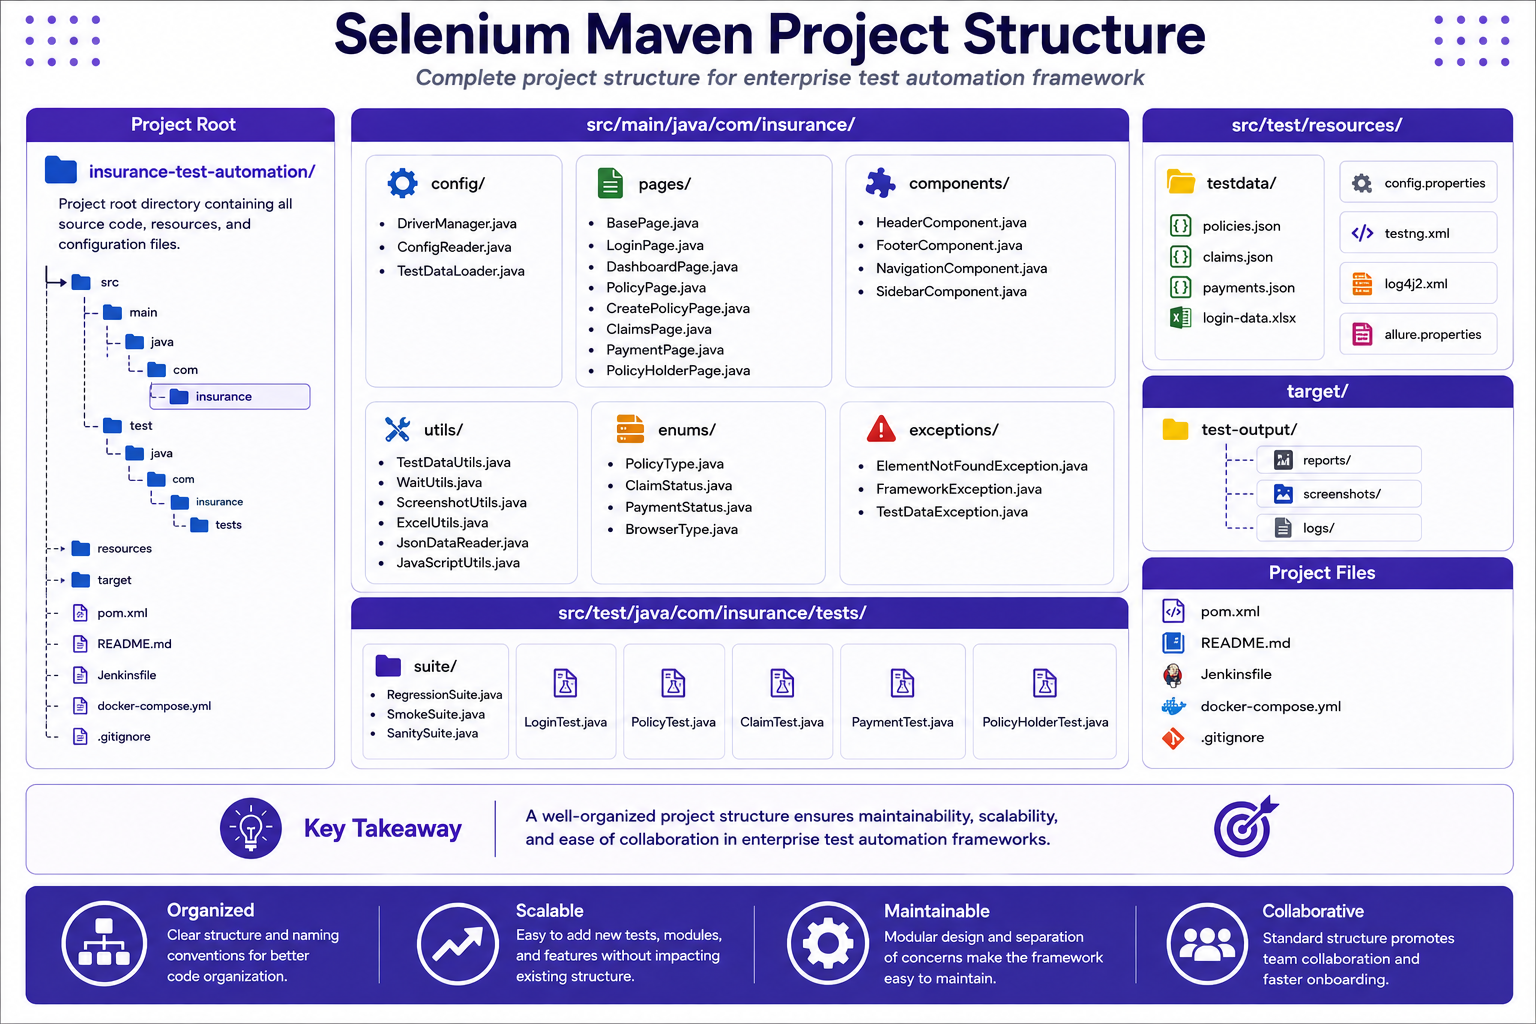
insurance-test-automation/
│
├── src/
│   ├── main/
│   │   └── java/
│   │       └── com/insurance/
│   │           ├── config/
│   │           │   └── DriverManager.java
│   │           ├── pages/
│   │           │   ├── BasePage.java
│   │           │   ├── LoginPage.java
│   │           │   └── DashboardPage.java
│   │           └── utils/
│   │               ├── TestDataUtils.java
│   │               └── WaitUtils.java
│   │
│   └── test/
│       └── java/
│           └── com/insurance/tests/
│               ├── LoginTest.java
│               ├── PolicyTest.java
│               └── ClaimTest.java
│
├── resources/
│   ├── testdata/
│   │   └── policy-data.json
│   └── testng.xml
│
├── pom.xml
└── testng.xml
testng.xml Configuration
<!DOCTYPE suite SYSTEM "http://testng.org/testng-1.0.dtd">
<suite name="Insurance Test Suite">

    <test name="Login Tests">
        <classes>
            <class name="com.insurance.tests.LoginTest"/>
        </classes>
    </test>

    <test name="Policy Tests">
        <classes>
            <class name="com.insurance.tests.PolicyTest"/>
        </classes>
    </test>

    <test name="Parallel Execution">
        <classes>
            <class name="com.insurance.tests.ClaimTest"/>
        </classes>
    </test>

</suite>
Running Tests
Maven Command
# Run all tests
mvn clean test

# Run specific test class
mvn test -Dtest=LoginTest

# Run specific test method
mvn test -Dtest=LoginTest#testValidLogin
Run with testng.xml
mvn clean test -Dsurefire.suiteXmlFiles=testng.xml
Best Practices
✅ Use WebDriverManager for driver setup
✅ Always use explicit waits over implicit waits
✅ Keep tests independent
✅ Use Page Object Model from the start
✅ Always close driver after test
✅ Use meaningful test method names
✅ Add proper logging
✅ Handle exceptions gracefully
Common Mistakes
❌ Not using WebDriverManager
❌ Hardcoding wait times
❌ Using Thread.sleep()
❌ Not handling exceptions
❌ Forgetting to quit driver
❌ Using brittle locators
❌ Not using proper assertions
Interview Questions
-
Explain Selenium WebDriver architecture.
-
What is WebDriverManager and why use it?
-
Difference between implicit and explicit wait?
-
What are different locator strategies?
-
How do you handle dynamic elements?
-
What is TestNG and why use it?
-
Explain TestNG annotations.
-
How do you run parallel tests?
-
What is a data provider?
-
How do you manage browser drivers?
Practice Exercises
-
Set up a Selenium Maven project.
-
Write a test to login to the insurance application.
-
Write a test to create a new policy.
-
Implement implicit wait in your tests.
-
Create a data provider for login credentials.
-
Write a test that handles dynamic elements.
Key Takeaways
- Selenium WebDriver follows a client-server architecture.
- WebDriverManager simplifies driver management.
- Proper waits are essential for reliable tests.
- TestNG provides powerful test management.
- Good project structure improves maintainability.
Chapter Summary
In this chapter, you learned:
- Selenium WebDriver architecture
- Maven project setup
- WebDriverManager configuration
- First Selenium test
- Locator strategies
- Browser interactions
- Synchronization strategies
- TestNG annotations
- Data providers
- Project structure
You now have a working Selenium test automation framework and are ready to implement the Page Object Model.
Next Chapter
👉 Next Chapter: Page Object Model and Framework Design