
Chapter 4: Linux Accounts, Permissions, and Least Privilege
Understand how Linux identifies users, organises users into groups, and controls access to files and directories. These fundamentals help system administrators and security practitioners protect shared systems, separate responsibilities, and grant only the access required for a task.
Lab environment: Use your own laptop with WSL 2 Ubuntu, an instructor-approved Linux virtual machine, or a browser-based Linux terminal such as Webminal. Start with read-only commands and files you create yourself. Use
sudo, account-management commands, and permission-changing commands only when the instructor-approved environment allows them. Never change permissions or accounts on a shared or production system without authorisation.
Learning objectives
By the end of this chapter, you should be able to:
- Explain the difference between a user account, a group, and a file owner.
- Distinguish authentication from authorisation.
- Read the owner, group, and permission fields shown by
ls -l. - Explain read (
r), write (w), and execute (x) permissions for files and directories. - Use
whoami,id,groups,ls -l, andgetentto inspect identity and group information. - Describe least privilege and explain why administrator access should not be granted by default.
- Plan a safe, group-based access model for a shared project directory.
1. Industry scenario: a shared student project folder
A team of five B.Tech students is working on a common project. The team lead needs to organise project files, team members need access to shared work, and students outside the team should not be able to modify the team's files. The team also needs to avoid giving every member administrator privileges.
The goal is to make access predictable: identify each user, assign users to an appropriate group, and give the project directory only the permissions required for the work. A secure setup should also be easy to review when a student leaves the team or their responsibilities change.
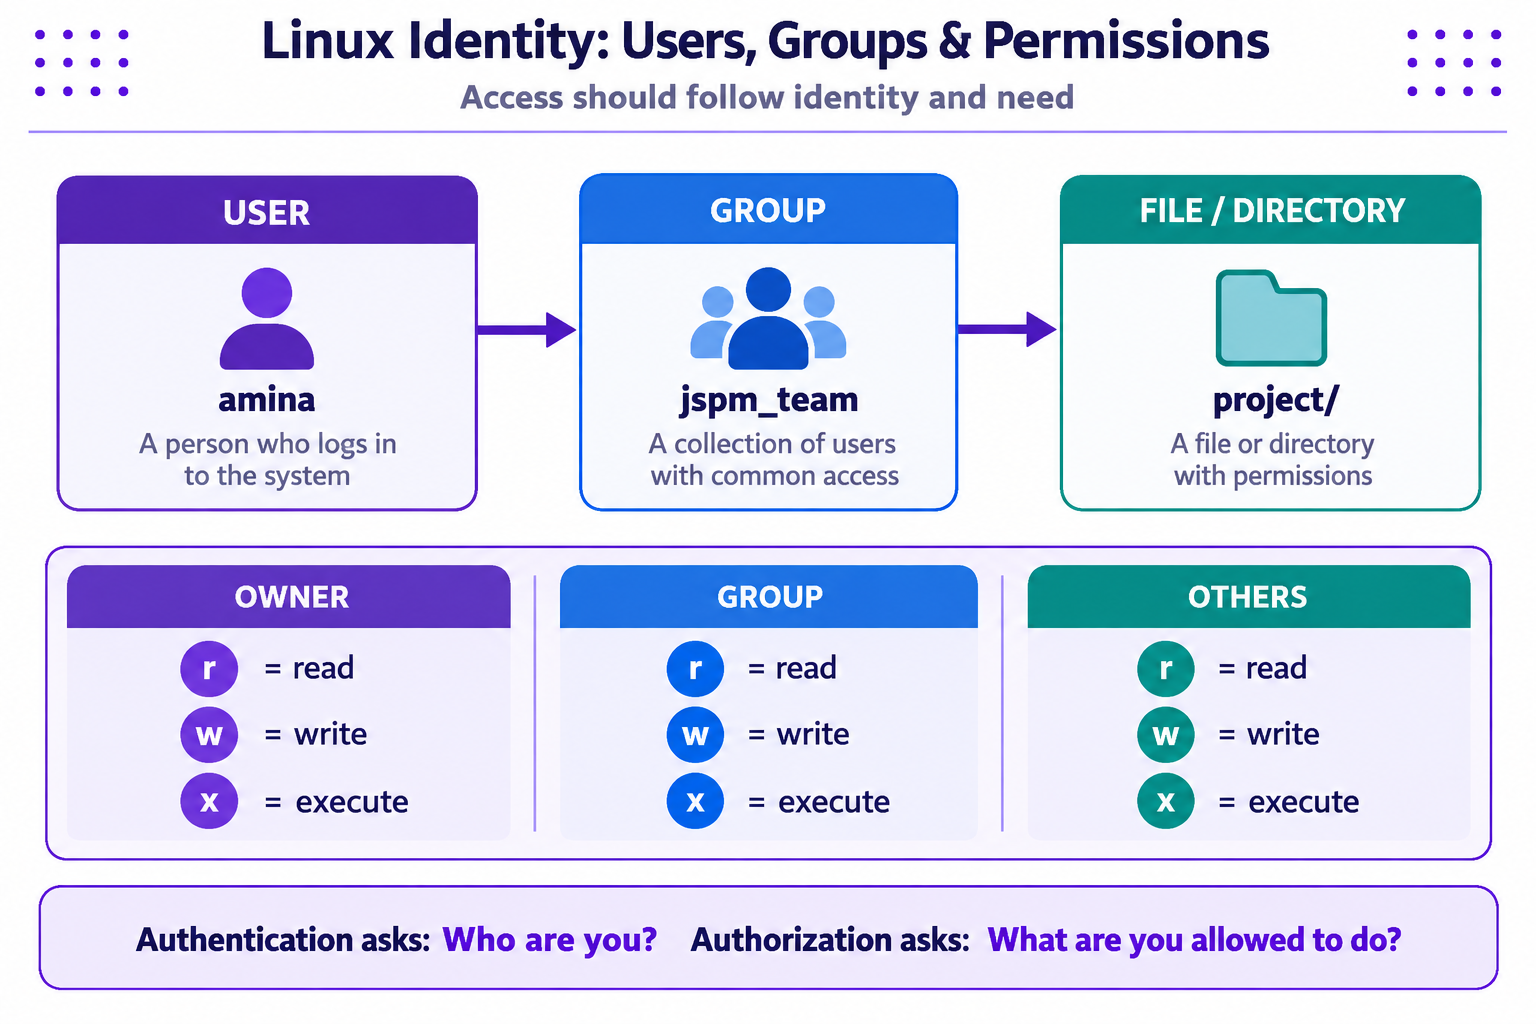
A useful mental model is user identity → group membership → file or directory permissions. Authentication establishes which account is being used; authorisation determines what that account can do.
2. Linux users and groups
Linux supports multiple user accounts on one system. Each account has a username and a numeric user ID (UID). Groups have names and numeric group IDs (GIDs) and can be used to grant a common set of access rights to several users.
- User: an individual account, such as
amina. - Group: a collection of accounts, such as
jspm_team. - Owner: the user associated with a file or directory.
- Group owner: the group associated with a file or directory.
- Others: users who are neither the file owner nor members covered by the file's group permissions.
Groups make shared access easier to manage than setting up separate rules for each team member. Membership alone does not grant every kind of access; the file or directory permissions still matter.
Safe commands to inspect identity
Run these in your own Linux environment or approved practice terminal:
whoami
id
groups
whoamiprints the effective username for the current shell.iddisplays the user ID, primary group, and supplementary groups.groupslists the groups associated with the current user.
To inspect group records where the system supports it, use:
getent group
getent group adm
The second command queries the group named adm as an example; available groups vary by distribution. Do not assume that every Linux environment has the same accounts or groups.
3. File ownership and permissions
Use ls -l to inspect file type, permissions, owner, group, size, modification time, and name:
ls -l
ls -l /etc/hosts
The second example reads directory metadata for a common system file; it does not modify the file. On a restricted browser terminal, some paths or commands may not be available.
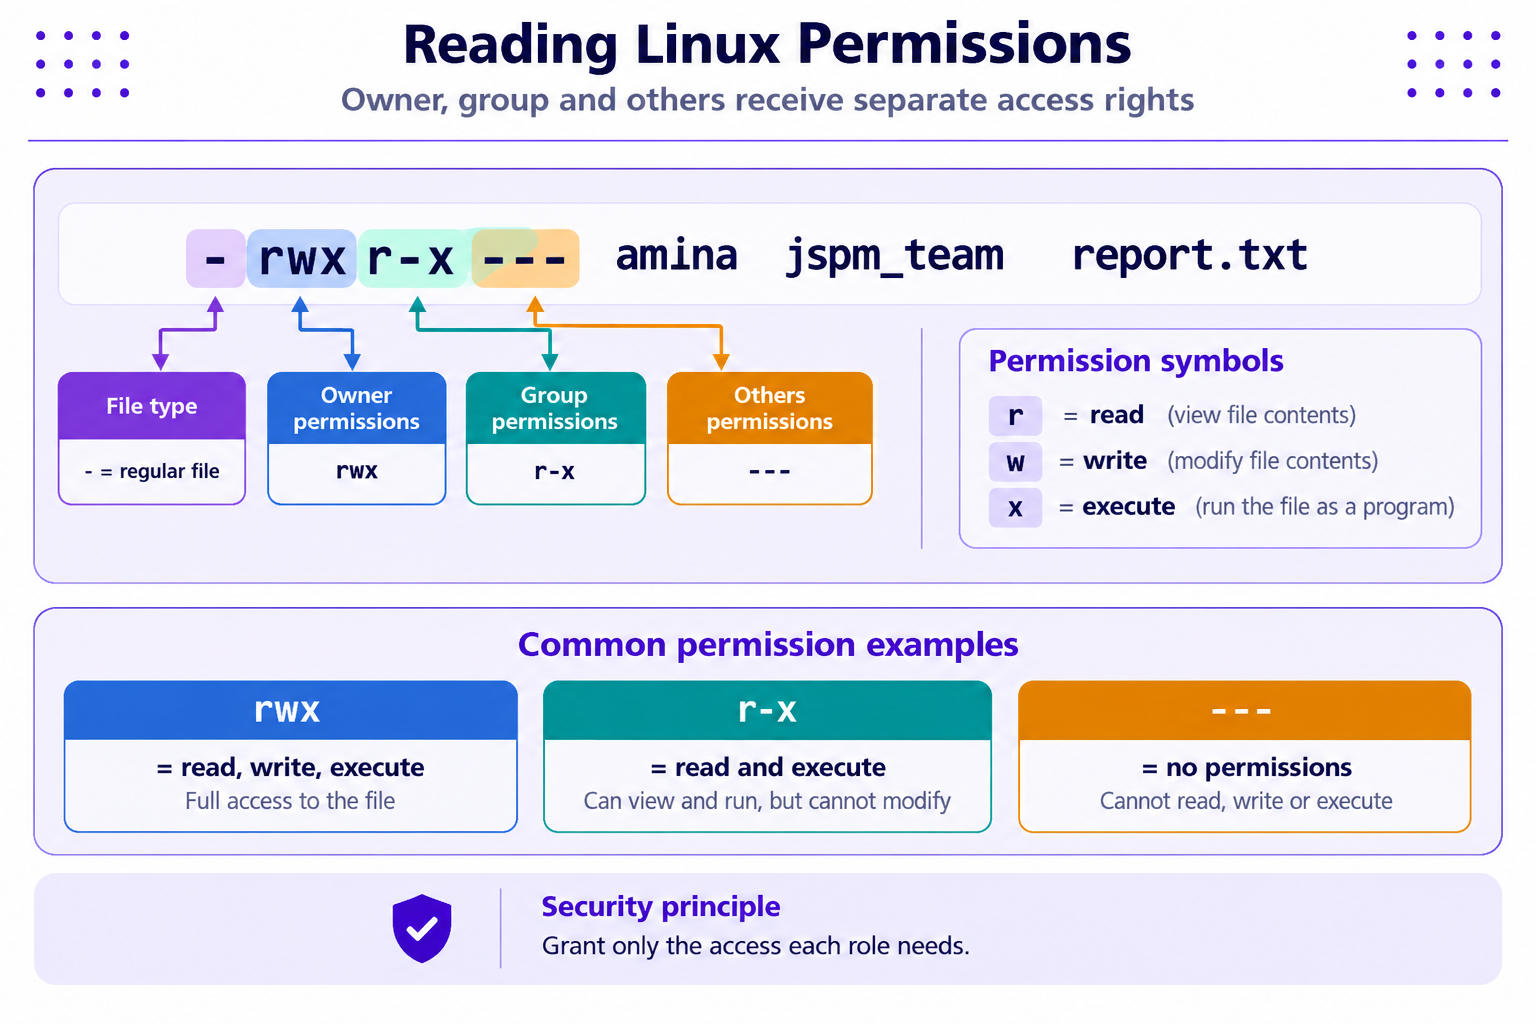
Consider this illustrative output:
-rwxr-x--- 1 amina jspm_team 1200 Oct 20 10:00 report.txt
The permission string begins with a file-type marker followed by three groups of permission characters:
-indicates a regular file in this example;dcommonly indicates a directory.rwxgives the owner read, write, and execute permissions.r-xgives the group read and execute permissions, but not write permission.---gives others no permissions on this file.
The owner and group names in the example are illustrative. The displayed permissions do not prove that a user can reach the file through every parent directory, that access controls elsewhere permit the request, or that the application using the file is secure.
4. What read, write, and execute mean
Permission meaning depends on whether the object is a file or a directory.
| Permission | Regular file | Directory |
|---|---|---|
r — read |
Read the file's contents | List names in the directory, subject to other permissions |
w — write |
Change the file's contents | Create, remove, or rename entries, subject to other permissions |
x — execute |
Run the file as a program or script, when applicable | Traverse/search the directory to access entries by name |
For directories, execute permission is often needed to traverse the path. A user may be unable to access a file even when the file itself grants read permission if the user lacks the required access on a parent directory.
A permission such as r-x does not mean “read-only” in every possible sense for a directory: execute permission allows traversal, while the lack of write permission generally prevents creating, deleting, or renaming entries inside that directory. File and directory permissions should be interpreted in context.
5. Least privilege: give only the access needed
The principle of least privilege means each account receives the minimum access needed to perform its assigned work, for only as long as needed. It reduces the impact of mistakes, compromised accounts, and unnecessary access.
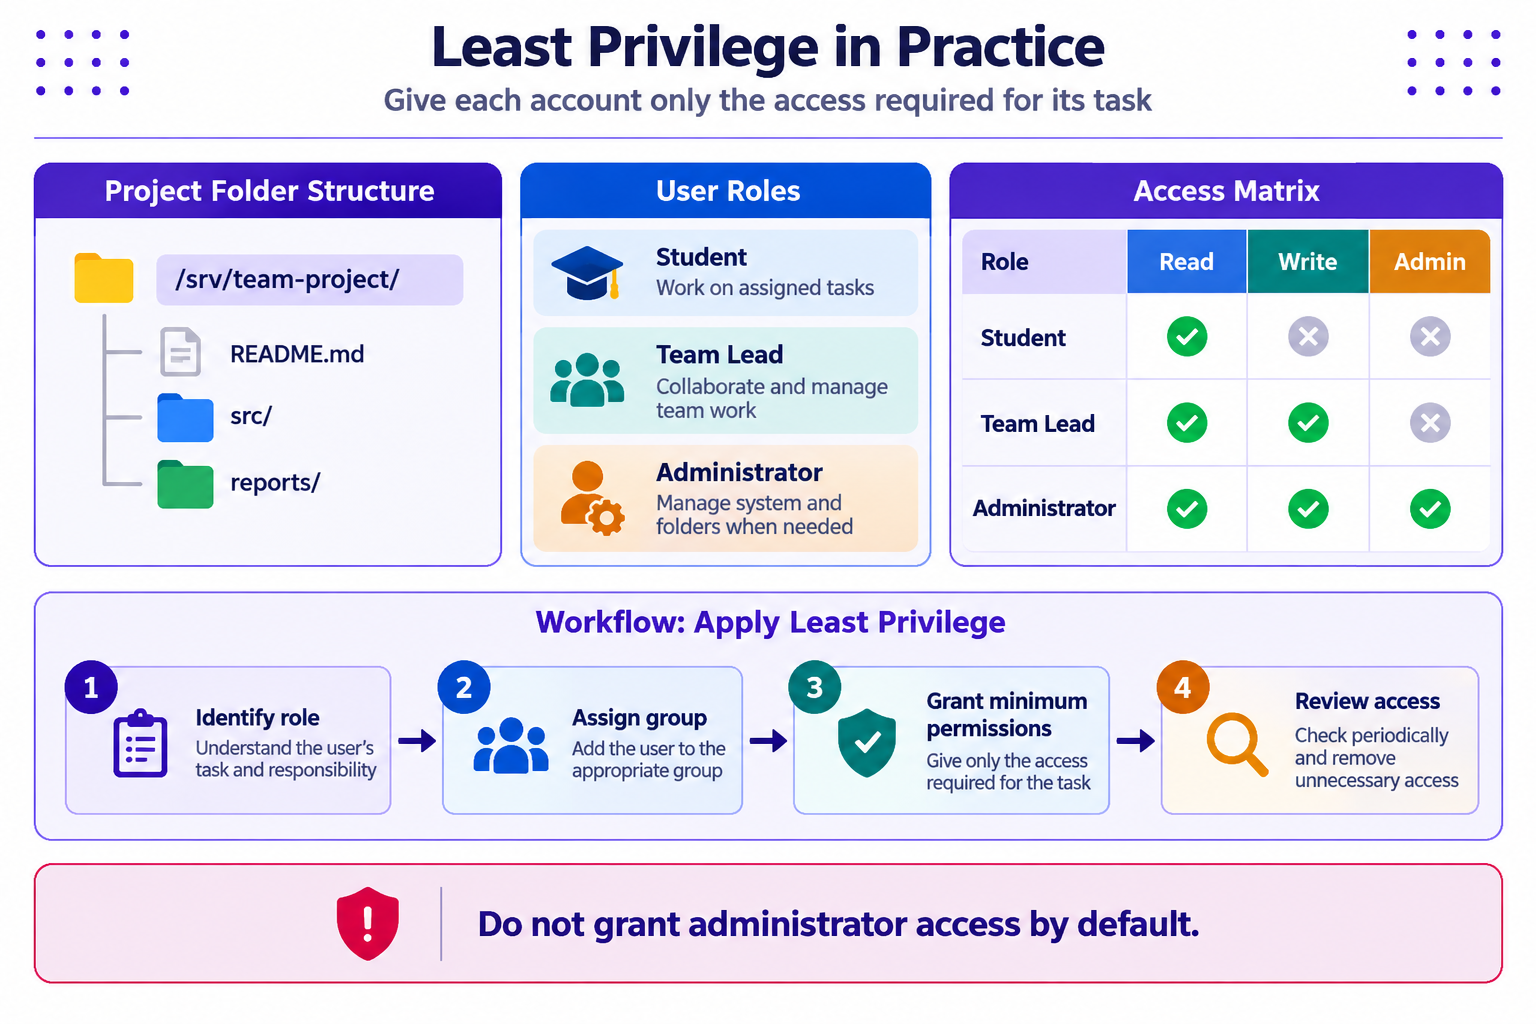
For the student project scenario, a simple access plan might be:
| Role | Typical need | Access approach |
|---|---|---|
| Team member | Read project instructions and contribute assigned files | Give access to the shared project group and relevant folders |
| Team lead | Coordinate work and maintain shared project files | Provide necessary project-level write access; avoid system-wide administrator access unless required |
| Instructor | Review submitted work | Grant read access to the required submission location where practical |
| Unrelated user | No project responsibility | Do not grant access unless there is a defined need |
This is a planning example, not a universal permission recipe. Real access should reflect the task, data sensitivity, directory layout, and local policy. Review membership when responsibilities change, and remove access that is no longer needed.
6. Inspect before changing anything
A safe administrator first gathers evidence and confirms the target. For an introductory exercise, use read-only inspection commands:
pwd
whoami
id
ls -ld .
ls -l
These commands show the current location, account identity, group memberships, and directory/file permissions. Record the output before making any change.
Commands such as chmod, chown, useradd, usermod, groupadd, and sudo can change system state or privileges. Use them only in a disposable lab or a system for which you have explicit permission. Some browser-based terminals do not provide administrative privileges, and a command failing there does not mean the same command is invalid on every Linux distribution.
Example: understanding a group lookup
getent group jspm_team
This asks the system's configured name-service sources for a group named jspm_team. If no record is returned, the group may not exist in that environment or may not be available through the configured name service. Do not immediately run sudo groupadd on a shared terminal; first confirm the lab instructions and whether you are authorised to administer that environment.
7. Practical exercise: design a team access model
Scenario: Five students are collaborating on a software project. One student is the team lead. They need a common project folder, and the team lead wants to manage access without granting every member administrator privileges.
Tasks
- Draw a simple folder structure for the project, such as a project root with
docs/,src/, andreports/directories. - Identify the users, the proposed project group, and the owner of the shared folder.
- Create an access matrix showing who needs to read, write, or execute files and who needs to traverse or modify directories.
- Explain why the group approach is easier to maintain than granting access individually to every file.
- State which read-only commands you would use to inspect the current user, group memberships, and permissions.
- Identify two risks of giving every student administrator privileges.
- Describe what should happen to a user's access when they leave the team.
Suggested reasoning
- Use a dedicated group to represent the project team when the environment and policy permit it.
- Grant access according to the task; do not give system-wide administrator rights merely because someone leads the team.
- Check ownership and permissions with
ls -lorls -ld, and identity withidandgroups. - Remove or update group membership when a person no longer needs access, following the administrator's approved process.
- Validate the result with a test account in an isolated lab; do not test access using another person's real account or files.
8. Mini-lab: permission observation table
Run the safe inspection commands in your approved environment and complete the table. If a command is unavailable, record that fact rather than trying to bypass the environment's restrictions.
| Check | Command | Record | Limitation |
|---|---|---|---|
| Current account | whoami |
Username shown | Does not list all privileges by itself |
| User and groups | id |
UID, GID, supplementary groups | Membership does not alone determine access to every file |
| Group list | groups |
Groups for the current account | Available groups differ between systems |
| Current directory metadata | ls -ld . |
Owner, group, permission string | Does not describe every file below the directory |
| File listing | ls -l |
File names, owners, groups, permissions | Does not prove effective access through all parent paths |
| Named group lookup | getent group jspm_team |
Group record, if present | No output may mean the group is absent or not discoverable in this environment |
Compare observations with the instructor's example. Differences between machines may be normal because the accounts, groups, and lab restrictions differ.
9. Key takeaways
- Linux uses users and groups to organise identity and shared access.
- Authentication answers “Who are you?”; authorisation answers “What are you allowed to do?”
ls -lshows file type, permission bits, owner, and group; interpret these fields together.- Read, write, and execute have different meanings for regular files and directories.
- Least privilege reduces unnecessary access and limits the potential impact of mistakes or compromised accounts.
- Inspect first, change only in an authorised environment, and verify changes with evidence.
10. Knowledge check
-
Which command displays the current username?
- A.
pwd - B.
whoami - C.
ls -l - D.
getent
- A.
-
In
ls -loutput, what do the three permission groups after the file-type marker represent?- A. Network, disk, and memory
- B. Owner, group, and others
- C. Read, list, and delete
- D. User, password, and shell
-
What does execute (
x) permission on a directory commonly allow?- A. Changing the system clock
- B. Traversing/searching the directory to access entries by name
- C. Automatically becoming root
- D. Encrypting every file in the directory
-
What is the principle of least privilege?
- A. Give all team members administrator access
- B. Give each account only the access needed for its task
- C. Disable all user accounts
- D. Use the same account for everyone
-
What does
getent group jspm_teamattempt to do?- A. Create the group
- B. Delete the group
- C. Look up the group record through configured name services
- D. Change every user's password
-
What is the safest first step before changing permissions on a shared system?
- A. Run
chmod -R 777on the project folder - B. Use
sudowithout checking the target - C. Inspect the environment, confirm authorisation, and understand the required access
- D. Make every user an administrator
- A. Run
Answer key: 1-B, 2-B, 3-B, 4-B, 5-C, 6-C.
Cybersecurity & Practices · JSPM University · B.Tech Year III
Practical-first learning: inspect identity, understand permissions, and grant only necessary access.